
Mary Ann Sprague, of Mary Ann’s Makings
Foundation paper piecing always elicits strong reactions in quilters. Either you
love it or hate it. I’ve never met anyone on the fence. As I was learning to
quilt, I took several paper piecing classes, and enjoyed the idea of creating an
intricate design using only straight lines, without having to fuss with exact
measurements, angles or precise cutting. All I needed was a printed paper
template.
Of course, the technique also had its frustrations. I invariably cut fabric larger
than needed to avoid mistakes. Angled pieces were hard to visualize which
direction to flip, and it could be hard to ensure the seam allowance was covered. It was frustrating to make a mistake and rip out the seam, all the while hoping the template paper stayed together long enough to sew the seam again!
Eliminating the Guess Work Out of Paper Peicing
Over time, I became comfortable with paper piecing, but it was still a slow
process and wasted fabric that got trimmed off along the way. As I developed
my Falling Leaves patterns (MAM-120 and MAM-125), I looked at simplifying
the assembly process. I identified fabric sizes for each template piece, and
made a chart of fabric sizes to pre-cut before assembly.

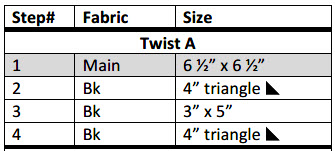
To properly leverage all these pre-cut fabric pieces, I created assembly tables
for each block. Each template consisted of the familiar lettered and numbered
pieces, indicating assembly order. Next to each piece was the corresponding
fabric and size needed. With this table, it became as simple as picking up the
next fabric piece to be sewn, positioning it on the template paper, and sewing.
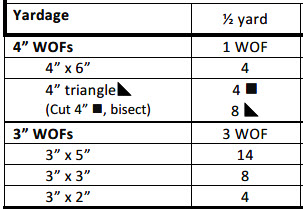
With the help of my co-author, Julia Deal of Sew Artistic, we further improved
the process, creating a cutting chart that simplified the cutting. By cutting the
indicated widths of fabric (WOFs), and then sub-cutting the WOFs into the
listed sizes, it became possible to pre-cut all needed fabric and accurately
predict yardage for a finished product, reducing fabric waste significantly.
The cutting chart and assembly table eliminated the guesswork for foundation
paper piecing. I could cut all the fabric for my pattern, and then chain stitch
multiple template pieces at one time, increasing the time savings even more.
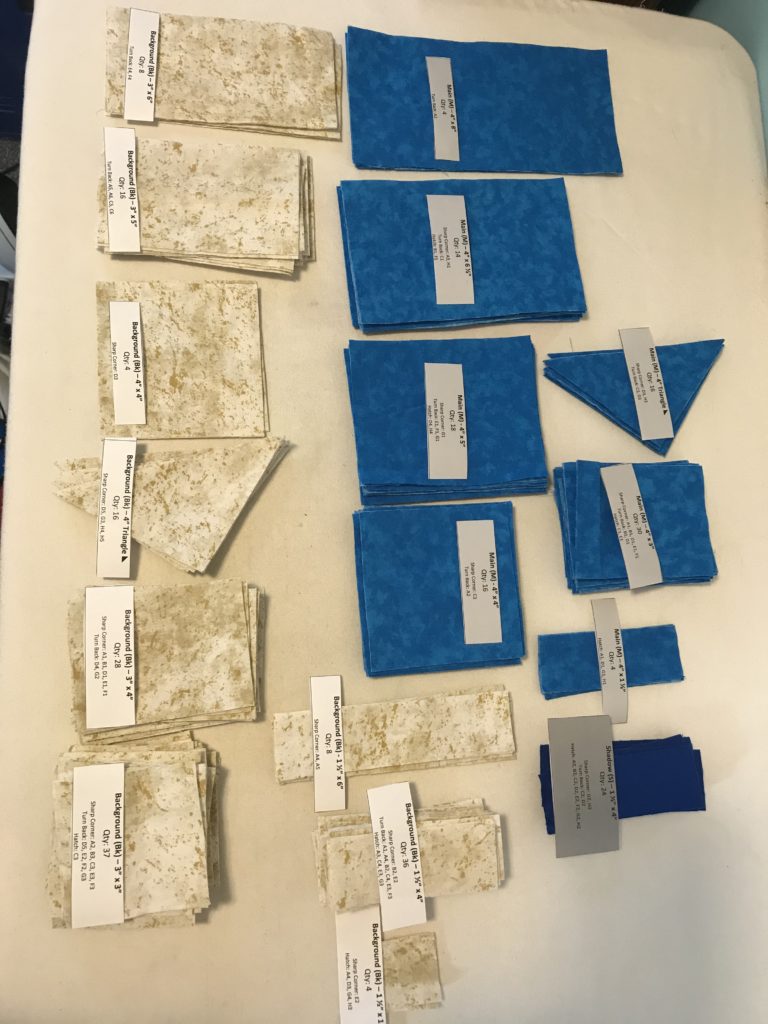
Organizing Your Pre-Cut Fabric
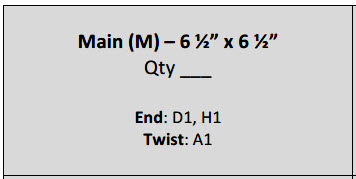
All of this pre-cut fabric was sometimes difficult to distinguish specific sizes, so
I also added labels to help with organization. I found it handy to lay out the
fabric pieces and labels on a board or nearby table, in increasing size, as
shown below. Then, the next piece was in an identifiable place and within
reach.
All my foundation paper-pieced patterns use this cut ahead and block
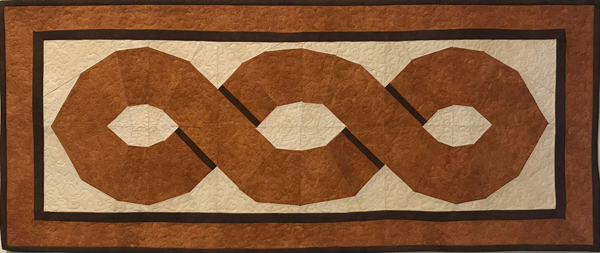
assembly technique to maximize fabric and time. My most recent pattern, the
Twisted Table Runner (MAM-135 – https://www.quiltwoman.com/patterns/twisted-table-runner-pattern-mam-135/ ), goes a step further and provides charts to create five different table runner sizes.
This simple preparation and assembly technique takes a great deal of pain out
of foundation paper piecing and enables you to easily create intricate designs
more quickly than ever before. Check out my other patterns on
QuiltWoman.com, https://www.quiltwoman.com/mam-mary-ann-sprague/ .

Thanks for the tips. I also precut the fabric pieces, allowing 1/4-1/2†extra. I have found that the most accurate way to position each fabric for sewing is by folding in half the edge to be sewn and marking the middle of the sewing line on the paper. Match the fabric fold to the halfway mark on the paper for a near-perfect lineup.
That’s a great idea. I’ll have to try it and see if it works on some of my more challenging angles. Having a really good light to hold pieces up to does wonders as well!